The Linux Open version of the CPUs SlimLine ARM9 is programmable in C through the GNU Compiler Collection (GCC) compiler. To facilitate its use, a VM Ware virtual machine with Ubuntu OS ready for use is provided. Below we provide instructions for installation and use.
Prepare and start the virtual machine
- Download the Ubuntu Linux virtual machine,
- Unzip the .zip file in a known area of your hard-disk,
- Download the free VMWare Player from the VMWare site (at least 4.0.1 versions) choosing the version suitable for your operating system and the processor in use (32 or 64bit),
- Install and start VMWare Player,
- Choose the virtual machine (SlimLineLinuxVM) downloaded, through the "Open a virtual machine" menu,
- Choose "Play virtual machine",
- Log into Ubuntu by setting the “GuestVM” password.
Configuration and connection with SlimLine
The CPU SlimLine ARM9 comes with the following Ethernet settings:
IP: 192.168.0.122
Mask: 255.255.255.0
Gateway: 192.168.0.1
To be able to perform operations on the CPU SlimLine from the Ubuntu virtual machine (e.g .: copy executable files), the virtual machine must have a setting for the eth0 interface compatible with that of the CPU SlimLine. Then either you change the IP of the SlimLine, adapting it to that of the virtual machine or vice versa.
The virtual machine eth0 is set by default with DHCP enabled, so if there is a DHCP server on the network, it will have already assumed the settings for eth0 provided by the server. It will therefore be necessary to check which ones he has assumed by right clicking on the 2 arrows at the top right and choosing “Connections informations…”.
If they are not compatible, you need to modify them by clicking right again on the 2 arrows at the top right and choosing "Edit Connections ..." and then "Wired" modifying the settings for eth0 to make them compatible with those of the CPU SlimLine. Example:
IP: 192.168.0.120
Mask: 255.255.255.0
Gateway: 192.168.0.1
Clearly, the IP addresses of the CPU and of the virtual machine must be unique within your network, so it is advisable, before connecting the devices to the network, or changing their settings, to check with a "ping" command that they are not devices with that IP address already exist.
If you now connect the CPU SlimLine to the ethernet network and power it, after about 30 seconds you will see the green RDY LED lit and the yellow RUN flashing. To check if it is visible from the virtual machine, simply open a terminal window and send a ping 192.168.0.122 command to which the CPU SlimLine will have to answer.
Program execution on CPU SlimLine
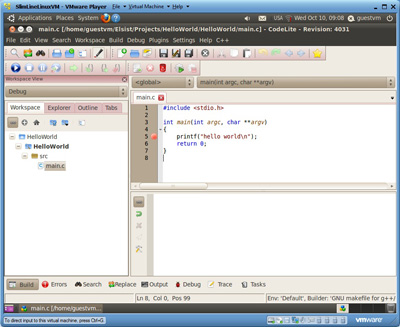
On the desktop of the Ubuntu VM there is already a CodeLite icon (an IDE for C and C ++); Follow these steps:
- Launch the program by double clicking on the CodeLite icon,
A "HelloWorld" sample project will open - Launch the compilation with F7 (or from the Build-> BuildProject menu);
If the CPU SlimLine has IP 192.168.0.122, the newly compiled program will also be uploaded to it via FTP (through a PostBuild command). Clearly if the CPU IP SlimLine has been modified, it will also be necessary to modify this command by right clicking on the project name and then Settings-> PostBuild.
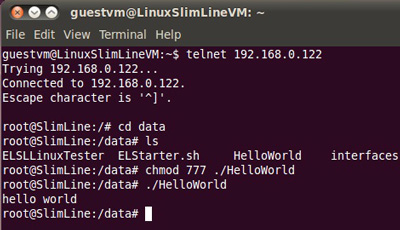
- To run the newly loaded program, open a terminal window by double clicking on the terminal icon and connect to the CPU SlimLine through the command:
telnet 192.168.0.122
The command prompt will appear:
root@SlimLine:/#
- Point the directory where the program was loaded with the command:
cd /data
(/ data is the only writable directory saved at shutdown),
- Set execute rights for the newly loaded executable with:
chmod 777 ./HelloWorld
- Run the program:
./HelloWorld;
The “hello world” print will appear.